Working with Lightroom Presets and Brushes from Sleeklens
- Thomas Mayrhofer
- Sep 27, 2016
- 4 min read

Recently I had the opportunity to use a workflow product from sleeklens.com (Thank you!). They offer a big variety of presets and brushes for Adobe Lightroom, actions and overlays for Adobe Photoshop and many templates for your daily graphical work. As I am mainly a landscape and nature photographer I was asked to review the “Through The Woods Workflow” from their Lightroom preset collection. With this package you get a hefty 51 presets and 30 brushes to enhance your pictures with ease.
Information: All pictures used in this article are RAW files, made by me with my Nikon D750.
Using the presets
First you have to install the presets. To do so, create a folder (I named mine Sleeklens Presets) in your preset menu in the develop module. Then right klick on the folder, klick on the import button and look for the preset files. By klicking OK the import is already done.

I started to look through the presets to find out how good they are. You find plenty of presets for different shooting occasions like sunset, autumn, warm and cold pictures and so on. In addition you can stack the presets and add different sorts of vignetting, add brightness, darken your image, reduce colors (blue, green, red and yellow), reduce or add clarity and so on. Furthermore, presets which produce black and white photos are offered. When applying a preset it automatically activates the correct lens profile, wherefore it’s no problem if you forget this step now and then.
You can get great pictures by only applying an all in one preset and enhance it by stacking it with other presets of the package. However, of course you can also use the normal adjustment options or the Sleeklens brushes to improve the delivered results.
Here I want to show you some before/after examples only using the presets:
1. Preset: Base – Color – Autumn Colors


2. Presets: All In One – Warm Shadows -> Tone/Tint Color Pop -> Polish – Punch It Up


3. Preset: All In One – Shine Into The Sunset


4. Presets: All In One – Calm Sunset -> Exposure – Brighten Shadows -> Tone/Tint – Warm It Up -> Polish – Add Clarity


5. Preset: All In One – Pressed In Time


6. Presets: All In One – Warm Shadows -> Exposure – Brighten -> Exposure – Less Highlights -> Tone/Tint – Color Pop -> Polish – Add Clarity


Using the brushes
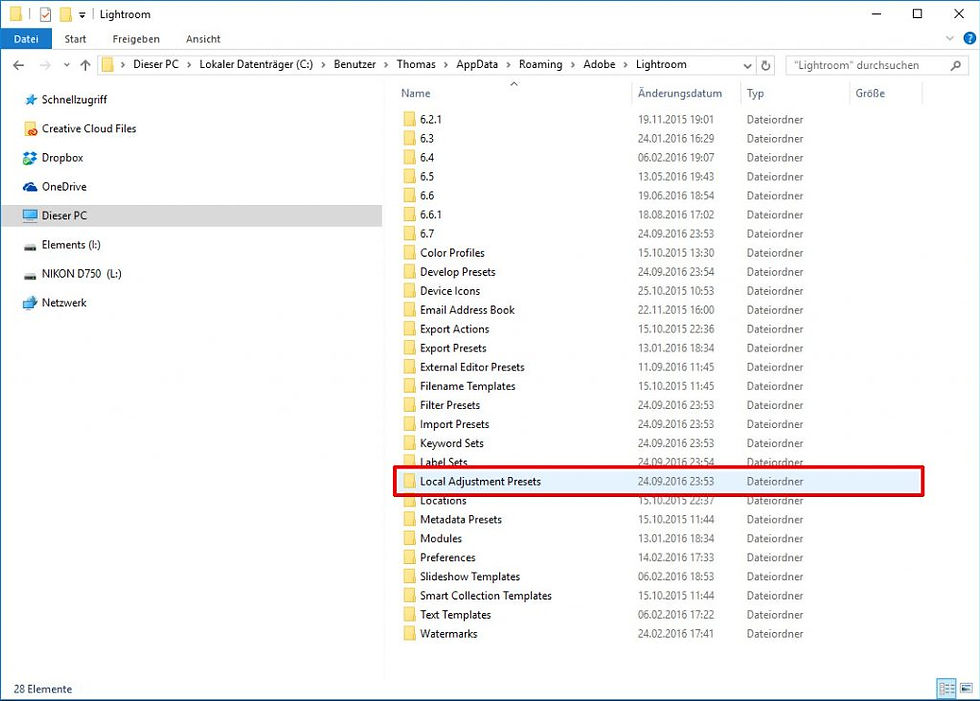
If the results delivered by the presets do not satisfy you, or if the existing presets are not enough due to e.g. extreme light conditions, it is possible to do the final corrections with the added brushes. Installation of the brushes is easy, too. You just have to copy the brush-files into a specific directory of your Lightroom installation (C:\Users\Username>\AppData\Roaming\Adobe\Lightroom).
Then open the “Adjustment Brush” menu in the develop module with the shortcut “K” or a click on the button. All brushes of the “Through The Woods” package will appear following a menu click on the effect tab.

In the following menu click on the effect tab and when you copied the files in the right directory all brushes of the “Through The Woods” package appears.

With the brushes you are able to locally edit the parts of the image that do not please you. You can adjust basics like contrast and clarity, colors, light and haze. Moreover, two brushes for more cloudy sky definition and water definition are available.
In the example you see on the screens above I edited a picture of my vacation in Ireland. It shows a lake in the Burren national park. I used some presets to bring it to shape and then enhanced the water texture of the lake with the “Effects – Water Definition” brush.


The following example I edited only with the brushes. This picture was taken on a gloomy day in the Almtal in Austria. Due to the very bright clouds and very dark landscape I used the brush “Light – Brighten Shadows” for the grassland, the brush “Light – Brighten” for the Mountains and the brushes “Effects – Cloudy Sky Definition” and “Haze – Golden” for the cloudy sky. I am very pleased with the results.


Conclusion
I have always been a fan of the Lightroom workflow with the photo organizer. The numerous options and the opportunity to create or use a big variety of presets make the life of a photographer a lot easier. There are many other great options to edit your files out there, but for me Lightroom works best. Comprehensive packages like “Through The Woods” from sleeklens.com make photo editing really enjoyable, not only for landscape shooters. Of course not every preset will suit your taste, but by combining different presets you can finalize photographs or create a foundation before adding your own settings. The presets are well made and not “into your face” with fancy colors, crazy contrast or extreme HDR look, they are easy to enhance with the brushes or, as said before, with your own settings. The brushes are all clearly named and do their things very well. If you are a fan of this kind of workflow I can recommend this package without a doubt.
Cheers Tom


Comments